Virtual Tour Blog by Panedia
enjoy beautiful, high resolution, panoramic photography
Jeju Island
These are the waters around Jeju Island which is the largest island off the Korean Peninsula. It has a dormant volcano in the centre of the island which is the tallest mountain in South Korea. Although it only has a population of 614,550 (2014) It holds the title of the worlds busiest air route from Jeju to Seoul with 10,156,000 passengers flying between the cities in 2012. These images were taken by Christophe Bailhache from The Ocean Agency and use technology developed by Panedia for the XL Catlin Seaview Survey.
Palmyra Atoll
There can be few places on earth more remote than Palmyra Atoll. In the middle of the Pacific Ocean, the nearest continent is almost 5,400 km (3,400 miles) to the north-east. Despite its isolation it has not been without drama, having had pirate treasure buried on it in 1816 and a bizarre murder in 1974. It has no permanent population nor has there been in its history. This did not not stop Commander Nichols of HMS Cormorant claiming it for the UK in 1889. He was unaware of a prior claim made by Hawaii. Today Palmyra is administered as a National Wildlife Refuge by the USA. These images were taken by Christophe Bailhache from The Ocean Agency and use technology developed by Panedia for the XL Catlin Seaview Survey.
Forgotten Oceans
This panorama is from the Calabas Reef in the Atlantic section of the Global Reef Record. Most of the work I do at Panedia is aimed at helping The Ocean Agency raise awareness of what is happening beneath the waves. One of the challenges is the seas are easily forgotten, People generally don’t spend much time down there. It is out of sight, so weeks, months and years can go by without considering the impact modern life has on them.
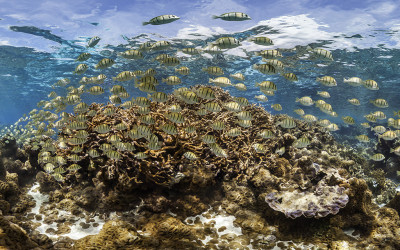
Yamada Point
This year I have been working on the coral reefs around Okinawa in Japan. These waters contain the oldest and largest reefs in the Northern Hemisphere. This area has experienced some of the most devastating effects of climate change which has accelerated coral bleaching. This coral plantation at Yamada Point was built by local fishermen and is now the largest man-made coral field at over 2.5 hectares. These images are a result of a collaboration between Panedia, Google, The Ocean Agency and the XL Catlin Seaview Survey. Although I don’t do the Photography I always enjoy working on these beautiful images.

National Museum of Australia
This beautiful pano from the National Museum of Australia sprout my curiosity about this odd shape building. The Museum was designed by architect Howard Raggatt shaped like a knot with ropes extending from the centre building, symbol of Australia story: ‘…not one but many Australians’ stories tangled together’. Another interesting feature are the exterior panels written in braille with typical Australian expressions and words of reconciliation. Personally I think this image is amazing in showing the strong colors and textures on this building.
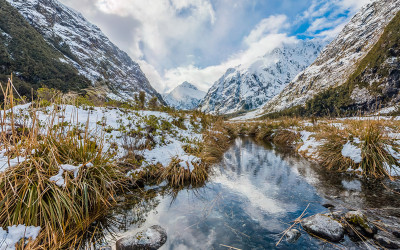
Hollyford River / Whakatipu Kā Tuka
At Panedia we will be sharing a bit of our imagery with you all. Images that are somehow special to us for this or that reason. I know that Aaron Spence shot this panorama in a glorious morning after a snow fall evening. He was simply amazed with the scenery and we all can see why… This region is part of New Zealand’s Fiordland in the South Island and this river is partially a ‘natural divider’ between the Southland and Otago regions. Following along the river is magnificent Hollyford Valley full of snow white peaks and rocky river beds. Enjoy a bit of ‘icy’ cool views while we are trying to cope with the winter heat wave (at least here in Oz). Google Maps

SS Maheno (wreck)
Love this Panedia picture taken by Aaron Spence. It is from Maheno wreck in Fraser Island. Apparently a popular tourist attraction but also a symbol of this area shallow waters. SS Maheno was an ocean liner from a New Zealand company that frequently crossed between Australia and New Zealand from 1905 to 1935. During World War I was used as a hospital ship carrying casualties from the Gallipoli campaign and other battles to, after the war, resume its regular commercial service. On the 7th July 1935, SS Maheno was hit by a severe cyclone while being towed by another ship. The towline connecting both ships parted and Maheno drifted to anchor on Fraser Island. Most of the crew manage swim onshore but eight men were never found. All attempts to re-float the ship failed and a wreck sale never found any buyers, so here it lays on its final purpose as tourism attraction. Google Maps

Brooklyn Bridge
What a better way to see New York than from Brooklyn Bridge. This panorama taken by Aaron Spence from the bridge at sunset says it all. The New York skyline under an intense orange to pink sunset, the distinctive towers shape and intricate cable patterns. From there you can ‘walk over’ the East River spotting the Statue of Liberty on one side and New York Bridge on the other. Google Maps

Jenolan Caves
These amazing limestone caves, west of the Blue Mountains are part of UNESCO World Heritage. Considered the world’s oldest known open cave system (aprox. 340 million years) the cave system counts with more than 40 km of passages, still being explored. For now, 11 caves are open to visitors to enjoy the magnificent limestone formations of astonishing beauty. I invite you to see this panorama of one of the 11 caves and to be amazed by nature’s work. Please look up and down. Jenolan Caves
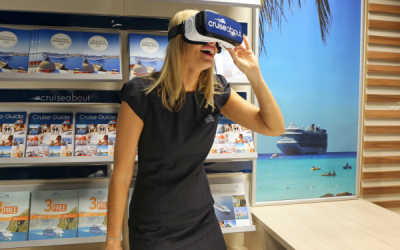
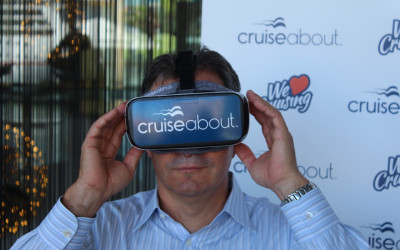
Cruising in 360 wins silver at the Sydney Design Awards
Panedia’s 360 cruise videos done for Cruiseabout were distinguished with a Silver Award at the Sydney Design Awards on the Digital – TravelTech category. This VR production was part of a broader marketing campaign that included the cruise VR experience combined with other traditional/digital marketing media, that aimed to get people a next to real experience before making a final decision on taking the cruise. This was an amazing and exciting project to be part of, and it is absolutely rewarding to see a client receive an award as recognition of a great use of this technology and of our high quality VR content.

Brooklyn, New York
When you are in New York, immediately you feel the rush… all is turning too fast: people walk fast, everybody seems too busy and even lunch is eaten fast or while you’re walking. Only the cars, are moving slowly…but that’s due to too much traffic. And that works for both day and night time, simply the sun is not there anymore. Crossing Brooklyn bridge is a must and doing it by sunset, a privilege. Once you cross the East River, you’re at Brooklyn and you move to a different rhythm. Somehow between Brooklyn and Manhattan bridges time slowed down for a bit. You can still see the city lights and sounds at a distance and you know all the swirl is there but here you can enjoy the views, the peaceful moments and beautiful colors, just before you dive back in, joining the fast pace of ‘The city that never sleeps’.

Qantas Founder Museum, Longreach
While filming VR content for Visit Queensland, Australia last year we were fortunate to spend some time with the wonderful Tony Martin, CEO at Qantas Founders Museum, Longreach, Queensland. Tony showed us around the Museum, and took us out to the Qantas airplanes, even doing a sunset shot from the wing of the 747. Here we’re up nice and close next to the gorgeous DC-3, while the Boeing 747 towers in the background. If you would like to see this in more detail check out our website for a VERY high rez file… you can see the rivets of the DC-3. Qantas Founder Museum, Longreach
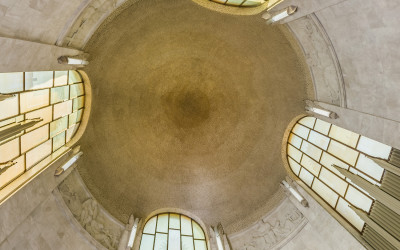
Buy a Star
In late 2015, we did this project for The ANZAC Memorial, Hyde Park Sydney. RSL requested a Gigapixel from the Memorial’s Great Dome of Stars, to celebrate the 100th anniversary of the First World War. In this part of the Memorial, we can find a domed ceiling covered in tiny golden stars. The ceiling of the Hall of Memory is 26 metres high. It is covered with 120,000 stars. The stars are a symbolic representation of the men and women from New South Wales who embarked for overseas service during the Great War: ‘this Golden Galaxy symbolises all those men and women from New South Wales who served in the war – one star for every man or woman who heard the call – a constellation of honour and memory totalling 120,000. These stars, placed high above the eye of the spectator and lighted by the amber glass of the great windows, makes of the interior of the Hall a place of sacred memories.‘ This project is part of a public fundraising campaign which replicated an original campaign that allowed the building finalization, back in 1934. The idea is to sell the Stars in a 360° photograph of the dome. Purchasers are able to tag their star and leave a message in memory of a veteran in this online Constellation of Honour and Memory. 81 years later, the funds raised will be used to new interpretive and education programs, heritage conservation and exhibition content, so that the Memorial is able to continue to play its vital role in telling the stories and sharing the history of NSW’s involvement in military operations. Panedia did this project in a record time, shooting the complete gigapixel 9 meters high on top of a Nodal Ninja carbon fiber pole and using a Seitz Roundshot VR Drive in less than 2 hours from setup to packing up. We had only a couple hours to do this shoot before the ANZAC Memorial was open to the public with no room for errors, we could only do a single quick test before the full gigapixel HDR shoot, that meant getting it right the first time…and we did. ANZAC Memorial
Qantas Safety Conference
Panedia was today at the Qantas Safety Conference showcasing its latest work and technology. All the participants valued our work and we were very happy with the feedback received. Panedia Facebook
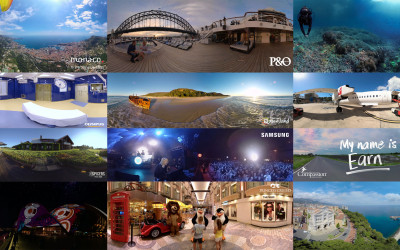
2016 Showreel
Over the past year we’ve worked with amazing clients to produce wonderful VR experiences. Please enjoy this small selection of commercial 360video projects. Panedia Showreel
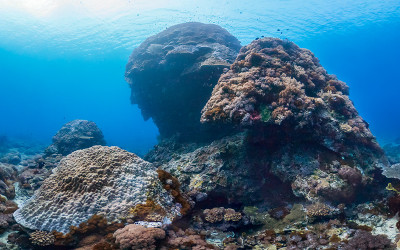
Typhoon Toppled Coral
This is the “Big Mushroom” coral off the Taiwanese coast. It was considered one of the worlds most iconic dive sites. Despite surviving being struck twice by submarines this 1000 year old life form was finally toppled by Typhoon Meranti recently. You can still experience this 12 metre high coral structure in all its glory thanks to this virtual dive we published in June. These images are a result of a collaboration between Panedia, Google, The Ocean Agency and the XL Catlin Seaview Survey. Although I don’t do the Photography I always enjoy working on these beautiful images.
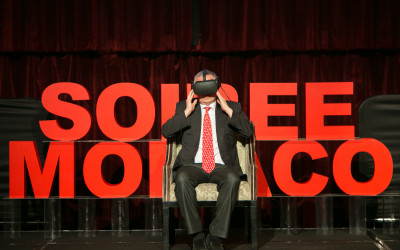
Monaco 360 Première
While the full project is not yet released, Panedia was showing Monaco 360 Première on the Gear VR. Sorry we can’t show any footage, still have to wait for full project release. It was an amazing Première of the Monaco 360 film in Melbourne. Feedback was extremely positive and everyone was in awe after experiencing Monaco 360. We came off it with a feeling of mission accomplished and grateful that we had such an opportunity to bring Monaco to Melbourne. Kudos to a great #Panedia / #Seaview360 team with Pierre Frolla, Aaron Spence, Christophe Bailhache, Sophie Ansel and James Siebert.
How Did We Do?
As an important client, we value your thoughts and would like to know how you felt about working with us. Please don’t be concerned about hurting our feelings, we really want to know where you’ve been delighted or unimpressed with our service. Let us know here. From the team at Panedia, we thank you. Panedia listens to you
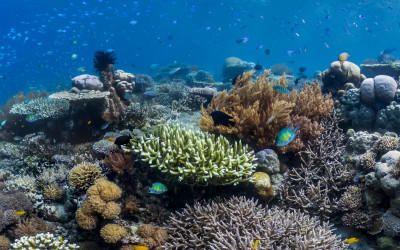
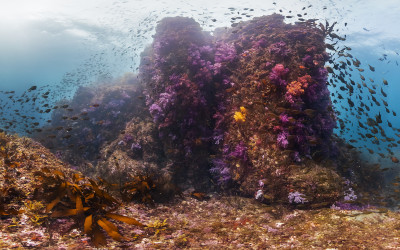
Raja Ampat
These are the waters around the Raja Ampat Islands in Indonesia. This area has the highest density of marine life in the world. The Great Barrier Reef in Australia is the largest coral reef system but it is relatively young compared to this one. The diversity of life here is helped by being uniquely placed between the Indian and Pacific oceans and three continental plates. These images are a result of a collaboration between Panedia, Google, The Ocean Agency and the XL Catlin Seaview Survey. This project takes up most of my working week, although I don’t do the Photography, I have a lot of fun working on these beautiful images in Photoshop.
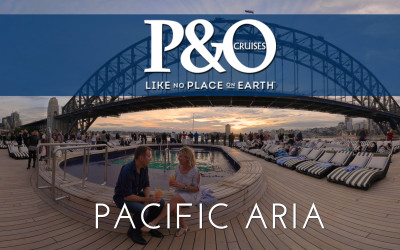
P&O Aria 360 Video
Our latest 360 Video Project was launched on Facebook. This is another project on a series we’ve been producing for a cruise ships client. Working on a tight schedule and trying to keep filming impact on customers to a minimum made it a bit difficult, still it was a lot of fun to produce. Filmed by Carlos Chegado and Aaron Spence with the help of Sandra Mexa and Michelle Spence P&O Cruises Australia
Compassion Australia VR Project sneak peak
An amazing VR project we produced with the wonderful Kym Basoka at Compassion Australia is packaged up by Kym and her team, and heading out to their field offices. The 7 minute story, set in Thailand isn’t available publicly yet, we can’t wait to show it to you, but you’ll have to wait I’m sorry.
Embedded Panedia Players
Try our new embedded Panedia players. This example will embed a single panorama onto your web page. Step 1: Include this JavaScript on your page once, ideally right after the opening tag. <script>/* Panedia Player – Required once per page*/ (function(d, s, id) {var js, fjs = d.getElementsByTagName(s)[0];if (d.getElementById(id)) return;js = d.createElement(s); js.id = id;js.src = “//embed.panedia.com/panedia-players.min.js?version=v1″; fjs.parentNode.insertBefore(js, fjs);}(document, ‘script’, ‘panedia-js’));</script> Step 2: Place this code wherever you want the plugin to appear on your page. <div class=”panedia” data-href=”https://embed.panedia.com/vtlite3/1?h=b” data-width=”800px” data-height=”400px”></div> This is the embedded panorama:-
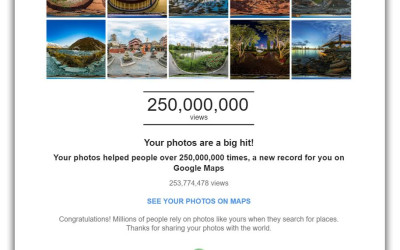
1/4 Billion views on Google Maps
Last week we received a rather nice email from our friends at Google. Something about 1/4 of a Billion views of our content on Google Maps. Google Maps Panedia
Panedia features in Gold Coast Bulletin
A article about our participation on the Google Street View Oceans Project. A nice article about our work but written with some imprecision. For those who want a bit more information, here some highlights: – In 2012 Panedia started a partnership with Catlin Seaview Survey project, working on a technical solution to capture high quality underwater 360 images. SVI was the first equipment designed able of capturing a high volume of data. Panedia had on the previous years developed systems able to deal with processing large amounts of data rapidly. Part of this content was added to Google Underwater Street View, now Google Oceans. – In 2013 SVII (a new version of the underwater capturing system) was developed and the GRR (Global Reef Record) was launched. – In 2014 Panedia started adding a small part of its vast content to Google Maps and registered record views, having reached 240+ Million views on its own content. If we add Panedia client’s content that we produced, like Sydney Opera House, Catlin Seaview Survey or Tourism Queensland, that number is about 440+ million. This project is ongoing and Panedia is proud to be collaborating now for 4 years with The Ocean Agency and Google on this huge task to survey the ocean, creating awareness for major climate issues like reef coral bleaching, ocean pollution and the need for reefs preservation. Panedia is also proud of its long path in the VR industry, having celebrated this year the 10th anniversary of the first panorama produced in Panedia systems. With a team that combines in between our 3 senior people more than 40 years experience, Panedia is one of the most experienced VR companies on the planet: we have been producing amazing VR content since the 90’s, that’s over 16 years. www.goldcoastbulletin.com.au

Golden Princess 360 Video
Welcome aboard Princess Cruises’ Golden Princess! Another VR project for Cruiseabout. Take the tour of the ship with our Virtual Reality experience by clicking and moving directions with your mouse on desktop, or swipe with your finger on mobile to get the full 360 degree view. Cruiseabout
Step onboard your cruise ship before you step onboard
It is always exciting when we see our work featuring the news… Our clients at Cruiseabout are making a good use of Virtual Reality, expanding its use both in Marketing and customer sales. Its all good use for the technology and a push to make reach the final consumer. Cruise Advise

RSL 336 – Hope Island and Caloundra
We just shoot two amazing homes for RSL. The RSL prize includes two coastal homes, each located in iconic Queensland beach destinations. A waterfront home, nestled in tranquil Hope Island, this spacious home provides the perfect place to enjoy waterfront living with its luxury in-ground swimming pool, expansive waterside deck and private 8m pontoon. Add to that an exclusive Caloundra beach apartment perfectly positioned between Bulcock Beach and Caloundra’s shopping precinct. From your private balcony you can take in the spectacular views all the way from Pumicestone Passage to the Glass House Mountains. www.rslartunion.com.au

Mater Prize Home 265 Biggera Waters
This prestigious family sized home is located in the tranquil Northern Gold Coast suburb of Biggera Waters, just minutes from popular shopping complex Harbour Town, Harbourside Markets, and the idyllic Paradise Point Parklands and Marina. Mater Prize Home
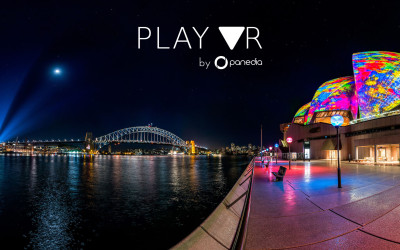
Play VR App
Today we’re launching the beta of our Samsung GearVR app, Play VR. http://www.panedia.com/playvr It’s an app we’ve developed specifically for VR demos at shows and for clients, while it also has ‘advanced’ features for viewing our own content. (or yours) We’ve done over 1,000 VR demo’s and have been frustrated at the limitations of the Oculus 360video player, and how slow it is to access content via the Oculus store. (3-4 clicks before you get to the content.) Play VR has various modes you can set depending on requirements: 1. LOOP MODE: Swipe up and select LOOP MODE. Then select the video to loop. Now the same video will play endlessly, while the touchpad controls are disabled. Clients will no longer change video/pause or otherwise mess up the demo when putting on the GearVR. To restart the video any time, just click the ‘back’ button. 2. DEMO MODE: Like Loop mode, it disables controls, but only while the video is playing. When the video finishes the user can select another video. 3. ADVANCED MODE (Default): Here we’ve added amazing tools no one has ever conceived like… Fast Forward, Rewind. (All Patented of course wink emoticon) Swipe forward to Fast Forward, Swipe back to rewind. Swipe up to bring up a menu when playing a video. Access chapter points and view description, author etc. We’ve built this app specifically for our own needs as Professional VR producers, if you find it useful too, all the better. We don’t have the app on the Oculus Store yet, so we need to add your Phone ID to the Beta app in order for it to work on your phone. This also allows you to launch the app directly from your phone, which is much quicker than going through the Oculus store. We’ve set up a method for getting your ID to us on our website, and we’ll update the app every day or 2 and let you know it’s ready for you to use. So have at it, and let us know what you think.

RSL 335 – Sydney, Melbourne and Noosa
Imagine living the investor’s dream and owning 3 luxury beach apartments, each located in iconic Australian destinations. Iconic Bondi Beach views in a Sydney apartment, Vibrant St Kilda foreshore views in Melbourne and a stylish penthouse apartment in the picturesque Noosa river and ocean views. www.rslartunion.com.au

200 M views on Google Maps
Two years after start using the Google Maps system for publishing VR content, we have reached 200 million views on our 360 degree panoramas. It is amazing to have reached this milestone, mainly because we jumped 100 million in a short 6 months time. More importantly, we are celebrating the joy and enthusiasm of having our high quality VR content available for people to experience a wide variety of places and virtually visit locations that most would not be able to do otherwise. At the same time, we count over 10 years of publishing our first panorama on the Panedia VR Production system and over 15 years of producing actual VR content. Right in the middle of the exciting ‘reaching the consumer market’ boom that VR is going through, we get ready for many more years of new projects, technology developments and hopefully, much more views on Google Maps.

RSL 334 – Kirra Beach
A luxury beachside lifestyle awaits the winner of this magnificent home. Sunrises will never be the same as you wake to uninterrupted ocean views from your huge private balcony. Located just steps from one of Queensland’s most loved surf spots, Kirra Beach, this 3 bedroom, 2 bathroom, home will take your breath away from the moment you step through the front door. www.rslartunion.com.au

Spicers Peak Lodge Virtual Tour
This was a project that we shoot last year. This is an amazing luxury mountain retreat stunningly situated on a mountaintop in Queensland’s Scenic Rim. Spicers Peak Lodge is as far from the pressure of everyday life as it’s possible to be. Let your cares melt away in our elegant suites and private lodges, enjoy an award-winning gourmet experience, unwind in Spa Anise or choose from a host of invigorating outdoor activities. Here, in Australia’s highest non-alpine lodge, relaxation and revitalisation come naturally. Spicers Retreats

Royal Caribbean Voyager of the Seas 360 Video
Welcome aboard Royal Caribbean International’s Voyager of the Seas. Take the full tour of the ship with our Virtual Reality experience that we have produced with Cruiseabout. The short 360 video version here A nice headline on the technology and our work Cruiseabout

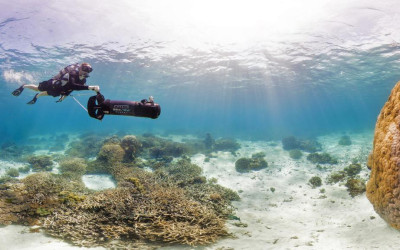
Coral Bleaching Images at National Geographic
The Australian government has rose the emergency response level and warns that bleaching may be linked to climate change. Panedia has been working with XL Catlin Seaview Survey and University of Queensland in closely monitoring the global coral reefs and comparing VR images taken before and after the bleaching phenomenon. The differences are visible and our imagery shows up in this National Geographic article. National Geographic

10 Years Of VR
10 years ago the first iPhone was more than a year away. Google Street View had well over a year until launch. Facebook wouldn’t become open for another 6 months. Palmer Luckey the founder of Oculus was 13 years old and VR as a head mounted modern technology was almost a decade from realisation. But 10 years ago, specifically at 5:22pm on March 8th 2006 a very important thing was happening at Panedia. It’s the day I shot the very first panorama (above) in what was to become our Panorama Production System. It’s around the time Michelle (my wife) and I decided to risk everything we had on VR and it’s close to the day Panedia was registered as a company. So it’s the day we celebrate 10 amazing years of Panedia. 10 years ago I was starting on a new journey. Sure I had been shooting panoramas for 6+ years at the time, but not as my only source of income. From that day onwards I was dedicated only to VR. Not only dedicated but prepared to spend every dollar I had and more, building a company and system to produce VR better and faster than ever before, and importantly with GPS data for online mapping. Many hundreds of thousands of dollars and years later, we have what I regard as the best professional panorama system there is. With our systems we have become the number one contributor to Google Maps worldwide. In fact just today we received an email from Google congratulating us on 175 million views of our VR content on Google Maps. From our systems we have developed Google Underwater Streetview, producing more underwater VR content than has ever existed before, enabling hundreds of millions of people to take virtual dives in our precious oceans. In addition to the content we produce, we’ve also built multiple VR CMS’s for ourselves and clients like the University of Queensland and Underwater Earth. Starting with little old me, a Nikon D200 + 10.5mm fisheye, a 360Precision panorama head, a lot of great ideas and even more grit we’ve managed to build one of the world’s foremost VR companies. We’ve been extremely fortunate to have very talented people join Panedia over the years, enabling us to consistency produce a quality and quantity of content that few can match. In recent years we’ve also been producing Virtual Reality experiences using 360video that are universally praised by people who know VR. I could go on for many pages singing the praises of our wonderful Panedia people, while telling stories of the amazing clients we’ve worked with, but I’ll stop now, and say to all who’ve been involved in our story in any way, thank you. Really, if you’re reading this, and we’ve ever met, talked on the phone, skyped, emailed or facebooked thank you for being part of our life. So much has happened at Panedia in the past decade, it’s been an exciting, crazy, wild and satisfying ride. As we start […]

Carnival Spirit 360° Virtual Cruising
One of the last projects we’ve been doing for Carnival. A lot hard work on it but also lots of fun to do. We will be shooting a few more ships soon. The short 360 video version here A nice headline on the technology and our work Cruiseabout

Horseshoe Bend , Arizona
A few years ago while we were in the US we drove around the West country, through Nevada, Arizona and Utah regions. Amazing landscape all around. The area were this panorama was shot, just between Utah and Arizona is specially rich in natural beauty. Horseshoe Bend is right half way between Marble Canyon and Antelope Island, following Colorado river. In this particular spot the river ‘bends’ 180 degrees craving and shaping the landscape. This is normally a very popular location but on that day strong winds were blowing and, perhaps for that reason, no one was around. We had to walk about 30 minutes and it was certainly worthwhile. The weather was not perfect and not the best time of the day to shoot, but the view was astonishing. Up there we could understand the magnitude of that place and nature’s thin equilibrium. The strong winds quickly became a sand storm and although from the image you could not tell, it was increasingly difficult just to be there. We did the way back to the car with sand blowing at us and getting into everywhere. In the end it was definitely rewarding to be able to see Colorado river and US West territory from that perspective. Enjoy the interactive image >> https://goo.gl/K15P16

Mater Prize Home 263 Noosa
Tucked away in the beach-side haven of Noosa Heads, this dream luxury home and lifestyle package is part of Mater Prize Home lottery. Mater Prize Home

RSL 333 – Harbourside Sydney
Make the most of your huge rooftop al fresco entertaining area to enjoy spectacular views of the Sydney Harbour Bridge and city skyline. Just imagine watching Sydney’s famous New Year’s Eve celebrations from your private deck. www.rslartunion.com.au
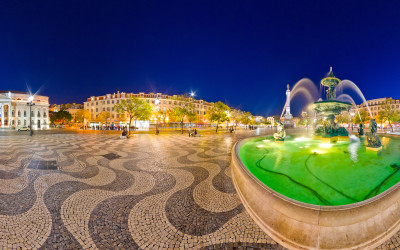
Lisbon – Rossio Square
Rossio Square, in Lisbon, is one of Portugal most visited and popular squares. Since 13th century it became place where the population would gather, when the city grew and the need to stay inside defense walls decreased. From that time it was commonly used for public ceremonies, markets, or just as a congregation place. In 1755, after a strong earthquake and tsunami this place was destroyed along with most downtown. In the following years a large city reconstruction plan was carefully undertaken and the square was rebuilt in a more organized and linear shape, that was fairly kept until today. This magnificent square with its traditional Portuguese mosaic pavement, still keeps the same use from 700 years ago. It has been the place of executions, celebrations, revolts, promenade or tourism and even the Portuguese Revolution but, it is mainly as ‘Rossio’ word states, a public common ground for people to meet. Enjoy the interactive image >> https://goo.gl/aipxkC
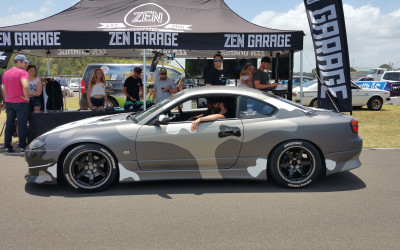
Need for Speed 360° Video
Last month our crew was in Sydney filming the Need for Speed Zen Garage car in 360° video. EA is launching the new Need for Speed game and with help of the community created a customized car. This immersive 360 degree video is part of their Official Launch Trailer Campaign. EA Games Australia & New Zealand
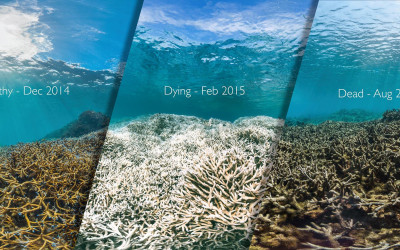
Global Coral Bleaching – 2015/2016
The US National Oceanic & Atmospheric Administration (NOAA) is predicting another strong El Niño and has now announced the third global bleaching event. This a new phenomenon is caused by ocean warming – corals are unable to cope with today’s prolonged peaks in temperatures. They simply haven’t been able to adapt to the higher base temperatures of the ocean. Although reefs represent less than 0.1 percent of the world’s ocean floor, they help support approximately 25 percent of all marine species. Panedia has been partnering with XL Catlin Seaview Survey for several years producing a wide imagery of the oceans worldwide and is now able to compare before and after images on several locations. The change is quite impressive and frightening. wwww.globalcoralbleaching.org

RSL 332 – Helensvale
Get the ultimate lifestyle with spectacular waterfront views in this amazing family home at Helensvale in the Gold Coast. Enjoy the al fresco area, complete with your own 12m sparkling pool, barbeque and 8m pontoon with deep water access. www.rslartunion.com.au

RSL 331 – Palm Beach
Enjoy three levels of breathtaking ocean views in this beautiful beachfront home perfectly located on the Gold Coast’s Palm Beach. Step onto the beach from your own backyard. www.rslartunion.com.au

100 Million Panorama Views on Google Maps
One and a half years ago we published our first virtual tour on Google Maps. It was a gorgeous sunrise walk around the base of Uluru (Ayers Rock), one of Australia’s most important landmarks. Given 99.999% of the world’s people will never visit Uluru we’ve enjoyed providing this content on our websites for years. But our websites don’t have the reach of Google, with 1 billion monthly visitors to Google Maps. So it was with much pleasure we published this group of panoramas on Google Maps to enable people from all over the globe to experience Uluru. Over the following months we published many other Virtual Tours from around the world that we’d had the privilege to photograph. From New York City to London, Paris, Tokyo, Nepal, Lisbon, Los Angeles, San Francisco and many other wonderful places. We are so very pleased that people have responded overwhelmingly to the content we’ve produced, this is reflected in the number of panorama views we’ve had: 100 Million Google Maps Views. To us it is extremely rewarding to see those numbers, while we continue to love ‘the magic’ in this technology that allows people thousands of kilometres away to be able to enjoy a specific place or event as much as we enjoyed capturing it. After more than 15 years producing 360 – VR content I never grow tired of it, and don’t believe I ever will. Panedia on Google Maps

ENDOALPHA 360/VR Video – St. Andrew’s Toowoomba
The extended seven minute cut of a 360/Virtual Reality video we shot at our latest ENDOALPHA 3D Operating Room Masterpiece installation at St. Andrew’s Towowoomba (QLD). To experience in 360 please use: Desktop – Latest Chrome, Firefox, Opera or IE 11 browser. Mobile – Youtube App for Android or iOS. For the optimum experience, please view this video with a Virtual Reality head set. Panedia YouTube Channel
Panoramas has inspiration for painters
Interesting article in this artist’s blog where it suggests to use VR content has inspiration for painters. Several Panedia VR images are showed has example. ‘Now you don’t need to go on a plane to travel and see the world’ says the Spanish painter in her blog. Pinturayartistas
Subscribe to Panedia News
We promise only send you beautiful, high resolution, panoramic photography posts for your enjoyment…
![]()